SQL Server Availability Groups were introduced back with SQL Server 2012. They are an awesome replacement for Database Mirroring (introduced back with SQL Server 2005 SP1), but with one huge limitation: the nodes on which the replicas are hosted must be part of the same Windows cluster. This doesn’t sound that at first, but a Windows cluster requires an Active Directory domain.
Over the last few years I have worked with a lot of different customers who were not able to deploy SQL Server Availability Groups because their nodes would be standalone workgroup servers that would not be part of any Active Directory domain. Things are different with SQL Server 2016 and Windows Server 2016. Let’s have a more detailed look at that.
Introducing SQL Server 2016 & Windows Server 2016
Prior to SQL Server 2016, Availability Groups were only part of the Enterprise Edition of SQL Server. This was yet another drawback when compared with Database Mirroring (because synchronous mirroring was available even in the Standard Edition). With SQL Server 2016 Microsoft now provides us with so-called Basic Availability Groups in the Standard Edition of SQL Server, which provides the same functionality as Database Mirroring:
- Only 2 Replicas
- Synchronous Commit
- 1 Database per Availability Group
- No readable Secondary
That’s great but there is still the requirement of a Windows Cluster, because SQL Server uses the functionality of WSFC (Windows Server Failover Clustering) to run the Availability Groups. But things are changing now with Windows Server 2016: in Windows Server 2016 you can create now a Windows cluster WITHOUT any Active Directory domain! That’s a BIG DEAL!
With SQL Server 2016 and Windows Server 2016 we finally have a replacement technology for Database Mirroring that also works with the Standard Edition of SQL Server. Over the remaining part of this blog post I now want to show you how you can configure a simple Basic Availability Group between 2 cluster nodes that are not part of any Active Directory domain. Let’s start!
Preparing the Windows Server 2016 Cluster
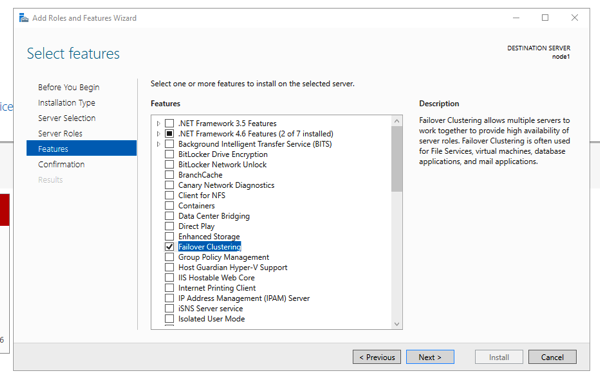
My specific scenario consists of 2 virtual machines that are running a fresh installation of Windows Server 2016 Technical Preview 4 (the latest preview version of Windows Server 2016 that was available at the time of this blog posting). After you have installed the Windows OS, you have to install the Failover Cluster feature on both nodes through the Server Manager.

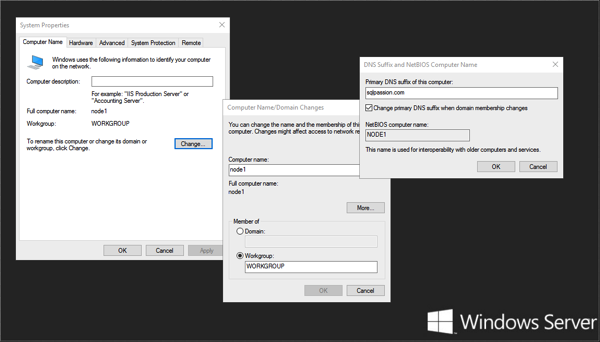
To be able to create a Windows cluster without any Active Directory domain you have to create a so-called Primary DNS suffix on both nodes. This is also documented in more detail on TechNet. In my case I have chosen the DNS suffix sqlpassion.com on both nodes.

After the configuration of the DNS suffix it is also very important that both nodes can be pinged from both sides through the FQDN (fully qualified domain name), like:
- node1.sqlpassion.com
- node2.sqlpassion.com
Because of simplicity I have configured a static IP address on both nodes (192.168.1.101 and 192.168.1.102) and disabled the firewall. I haven’t configured any DNS server in my simple scenario, therefore I have added the FQDN of other node into the HOSTS file (stored in c:\windows\system32\drivers\etc) on both nodes. If the FQDN can’t be resolved, then you are not able to create the Windows cluster.
If you create the Windows cluster with another account as the default built-in admin account, you also have to change a registry policy through PowerShell as follows on both nodes (make sure to start the PowerShell command prompt with administrative privileges):
new-itemproperty -path HKLM:\SOFTWARE\Microsoft\Windows\CurrentVersion\Policies\System -Name LocalAccountTokenFilterPolicy -Value 1
If you have done all these prerequisites you are now finally able to create the Windows cluster. With the Technical Preview 4 of Windows Server 2016 you are only able to create the cluster through PowerShell, because there isn’t yet any GUI support available for this. The following PowerShell command creates the Windows cluster between both nodes, names the cluster sqlbag and gives it the static IP address 192.168.1.110:
new-cluster -name sqlbag –Node node1,node2 -StaticAddress 192.168.1.110 -NoStorage –AdministrativeAccessPoint DNS
Creating the SQL Server Availibilty Group
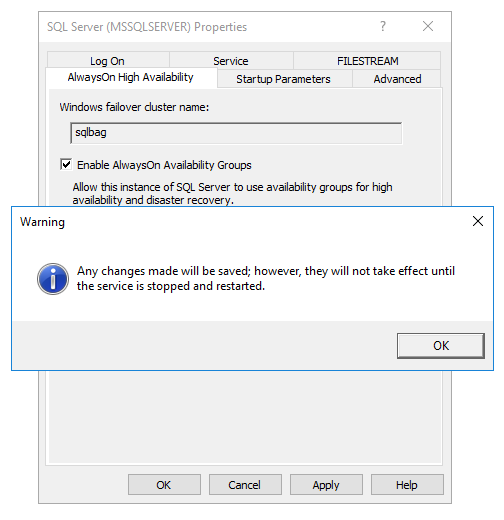
After the successful creation of the Windows cluster, you can now install SQL Server 2016 CTP 3.2 on both nodes. When the installation has succeeded you are finally also able to enable the Availability Group support through the SQL Server Configuration Manager (and you have to restart SQL Server!):

Now you have done all the preparations to finally deploy your first Availability Group. Unfortunately you also have to think about the security configuration between both nodes. In my case I have chosen to use a Certificate based security configuration, because it implies the same security configuration as in a distributed Service Broker scenario. Let’s walk step by step through the security configuration, because it is a little bit more complex to set up.
In the first step you have to perform the following actions on both nodes:
- Create a Database Master Key
- Create a new security certificate
- Backup the public-key portion of the security certificate to the file system
- Create a new SQL Server endpoint that is used for *Database Mirroring* – ouch… 😉
The following code shows all these steps.
-- ====================================
-- Execute the following code on NODE1
-- ====================================

USE master
GO

-- Create a database master key
CREATE MASTER KEY ENCRYPTION BY PASSWORD = 'passw0rd1!'
GO

-- Create a new certificate
CREATE CERTIFICATE SQLBAG_Certificate_Node1_Private
WITH SUBJECT = 'SQLBAG_Certificate_Private - Node 1',
START_DATE = '20160101'
GO

-- Backup the public key of the certificate to the filesystem
BACKUP CERTIFICATE SQLBAG_Certificate_Node1_Private
TO FILE = 'c:\temp\SQLBAG_Certificate_Node1_Public.cert'
GO

-- Create an endpoint for the Availability Group
CREATE ENDPOINT SQLBAG_Endpoint
STATE = STARTED
AS TCP
(
	LISTENER_PORT = 5022
)
FOR DATABASE_MIRRORING
(
	AUTHENTICATION = CERTIFICATE SQLBAG_Certificate_Node1_Private,
	ROLE = ALL,
	ENCRYPTION = REQUIRED ALGORITHM AES
)
GO

-- ====================================
-- Execute the following code on NODE2
-- ====================================

USE master
GO

-- Create a database master key
CREATE MASTER KEY ENCRYPTION BY PASSWORD = 'passw0rd1!'
GO

-- Create a new certificate
CREATE CERTIFICATE SQLBAG_Certificate_Node2_Private
WITH SUBJECT = 'SQLBAG_Certificate_Private - Node 2',
START_DATE = '20160101'
GO

-- Backup the public key of the certificate to the filesystem
BACKUP CERTIFICATE SQLBAG_Certificate_Node2_Private
TO FILE = 'c:\temp\SQLBAG_Certificate_Node2_Public.cert'
GO

-- Create an endpoint for the Availability Group
CREATE ENDPOINT SQLBAG_Endpoint
STATE = STARTED
AS TCP
(
	LISTENER_PORT = 5022
)
FOR DATABASE_MIRRORING
(
	AUTHENTICATION = CERTIFICATE SQLBAG_Certificate_Node2_Private,
	ROLE = ALL,
	ENCRYPTION = REQUIRED ALGORITHM AES
)
GO
In the next step we establish a trusted relationship between both nodes by creating a new login and user for the other node, and finally authorizing the user on the public key portion of the certificate from the other node. And you also have to grant the CONNECT permission to the previous created login. The following code shows how to accomplish these steps.
-- ====================================
-- Execute the following code on NODE1
-- ====================================

-- Create login for the other node
CREATE LOGIN Node2Login WITH PASSWORD = 'passw0rd1!'
GO

-- Create user for the login
CREATE USER Node2User FOR LOGIN Node2Login
GO

-- Import the public key portion of the certificate from the other node
CREATE CERTIFICATE SQLBAG_Certificate_Node2_Public
AUTHORIZATION Node2User
FROM FILE = 'c:\temp\SQLBAG_Certificate_Node2_Public.cert'
GO

-- Grant the CONNECT permission to the login
GRANT CONNECT ON ENDPOINT::SQLBAG_Endpoint TO Node2Login
GO

-- ====================================
-- Execute the following code on NODE2
-- ====================================

-- Create login for the other node
CREATE LOGIN Node1Login WITH PASSWORD = 'passw0rd1!'
GO

-- Create user for the login
CREATE USER Node1User FOR LOGIN Node1Login
GO

-- Import the public key portion of the certificate from the other node
CREATE CERTIFICATE SQLBAG_Certificate_Node1_Public
AUTHORIZATION Node1User
FROM FILE = 'c:\temp\SQLBAG_Certificate_Node1_Public.cert'
GO

-- Grant the CONNECT permission to the login
GRANT CONNECT ON ENDPOINT::SQLBAG_Endpoint TO Node1Login
GO
After these various steps, the security configuration between both nodes is completed and you are finally able to deploy your first Availability Group. The following code creates a simple database, performs a full database backup, and finally creates the Availability Group with 2 replicas (primary & secondary replica).
-- ====================================
-- Execute the following code on NODE1
-- ====================================

USE master
GO

-- Create a new database
CREATE DATABASE TestDatabase1
GO

-- Use the database
USE TestDatabase1
GO

-- Create a simple table
CREATE TABLE Foo
(
	Bar INT NOT NULL
)
GO

-- Make a Full Backup of the database
BACKUP DATABASE TestDatabase1 TO DISK = 'c:\temp\TestDatabase1.bak'
GO

USE master
GO

-- Create a new Availability Group with 2 replicas
CREATE AVAILABILITY GROUP TestAG
WITH
(
	AUTOMATED_BACKUP_PREFERENCE = PRIMARY,
	BASIC,
	DB_FAILOVER = OFF,
	DTC_SUPPORT = NONE
)
FOR DATABASE [TestDatabase1]
REPLICA ON
'NODE1' WITH
(
	ENDPOINT_URL = 'TCP://node1.sqlpassion.com:5022',
	FAILOVER_MODE = AUTOMATIC,
	AVAILABILITY_MODE = SYNCHRONOUS_COMMIT,
	SECONDARY_ROLE
	(
		ALLOW_CONNECTIONS = NO
	)
),
'NODE2' WITH
(
	ENDPOINT_URL = 'TCP://node2.sqlpassion.com:5022',
	FAILOVER_MODE = AUTOMATIC,
	AVAILABILITY_MODE = SYNCHRONOUS_COMMIT,
	SECONDARY_ROLE
	(
		ALLOW_CONNECTIONS = NO
	)
)
GO
Afterwards you have to join the Availability Group on the other node as shown in the following listing.
-- ====================================
-- Execute the following code on NODE2
-- ====================================

-- Make the Availability Group available on NODE2
ALTER AVAILABILITY GROUP [TestAG] JOIN
GO
And finally we have to prepare the database on the 2nd node. Therefore you have to perform now a transaction log backup on the primary replica in the first step. And afterwards you restore the full database backup and the completed transaction log backup on the 2nd node (both with NORECOVERY). And then you just move the database on the 2nd node into the Availability Group.
-- ====================================
-- Execute the following code on NODE1
-- ====================================

-- Make a TxLog Backup of the database
BACKUP LOG TestDatabase1 TO DISK = 'c:\temp\TestDatabase1.trn'
GO

-- ====================================
-- Execute the following code on NODE2
-- ====================================

-- Restore the Full Backup with NORECOVEY
RESTORE DATABASE TestDatabase1 FROM DISK = 'c:\temp\TestDatabase1.bak' WITH NORECOVERY
GO

-- Restore the TxLog Backup with NORECOVERY
RESTORE LOG TestDatabase1 FROM DISK = 'c:\temp\TestDatabase1.trn' WITH NORECOVERY
GO

-- Move the database into the Availability Group
ALTER DATABASE TestDatabase1 SET HADR AVAILABILITY GROUP = TestAG
GO
When you now check the health of the Availability Group through the Dashboard, you can see that everything works as expected – a Basic Availability Group in SQL Server 2016 without any need for an Active Directory domain in Windows Server 2016 – nice .
Summary
In the course of this blog posting I have shown you how easy it is to configure a Basic Availability Group in SQL Server 2016 without any Active Directory domain. Microsoft made this possible by removing the requirement for a domain for a Windows cluster in Windows Server 2016. After 4 years we have finally a fully functional replacement technology for Database Mirroring. Sometimes good things take time…
If you want to learn more about Availability Groups in SQL Server, make sure to checkout my other blog postings that I wrote about a few years ago:
- SQL Server 2012 AlwayOn Availability Groups – Part 1
- SQL Server 2012 AlwayOn Availability Groups – Part 2
- SQL Server 2012 AlwayOn Availability Groups – Part 3
- SQL Server 2012 AlwayOn Availability Groups – Part 4
Thanks for your time,
-Klaus
24 thoughts on “How to create a SQL Server Availability Group WITHOUT an Active Directory Domain”
Thanks for the details Klaus.
So what now is the difference (advantages/disadvantages) between mirroring and alwayson in this case and why should we choose one over the other?
Hello Brett,
Thanks for your comment.
Database Mirroring is a deprecated feature and will be removed in a future version of SQL Server.
Availability Groups gives you much more functionality (in the Enterprise Edition):
*) More databases per AG
*) Multiple Secondaries
*) Readable Secondaries
*) Multiple Failover Pairs
*) …
Thanks,
-Klaus
Hello Klaus,
do you know the reason, why SQL Server etup still depends on the .Net Framework 3.5 SP1?
Hello Christian,
No idea on that one.
But every time when I install SQL Server on a fresh VM, I forget to install it in the 1st step 😉
Cheers,
-Klaus
Great article as usual Klaus
You can create an AD detached cluster under Windows 2012 R2, the benefit here is that it does not require AD admin intervention for the WSFC deployment and deployment of any cluster roles. There are restrictions though, see this link
https://technet.microsoft.com/en-us/library/dn265970.aspx
Just need to remember that tech preview editions are liable to change, I personally would hold off any config article until I get hold of the final product
Regards Perry
Hello Klaus,
Brilliant article. I believe the issue I’m facing will definitely be solved with the certificates setup mentioned above.
One quick question though, would you happen to know how many Basic Availability Groups can we create on SQL Server 2016 Standard Edition?
I know there’ll only be 1 Availability Database per AG but there is no mention of the number of AG’s we can create.
Cheers,
Nick
Hello Nick,
Thanks for your comment.
I don’t think that there is a technical limitation how many AGs you can have per instance.
Thanks,
-Klaus
Have you considered any ways of “mimicking” the behaviour of the SQL Listener. As Basic AGs don’t have it. Am looking into this and just trying to come up with a way to provide some level of listener functionality.
Hello Paul,
No, I haven’t yet tried that one.
Thanks,
-Klaus
hello.
I have the release version of windows server 2016 and MSSQL 2016. I have manage to create 2 node cluster, but I’m unable to install SQL using “New SQL Server failover cluster installation”. it’s asking me for domain account to run the services.
what to do?
How do I install the MSSQL server ?
Hello,
Please ask general technical questions on a forum like StackOverflow.com.
Thanks,
-Klaus
Hi,
thank you for this article. Can I ask couple questions ?
Can this be applied in Azure ? I am trying to repeat this in azure and I have couple issues..
Do you have two different Network cards ?
Are you using DNS ? If not how you manage cluster error 1196 ?
I now trying to set up SQL, so hope I manage it…
Thank you
Will it allow automatic fail-over?
Yes 🙂
Klaus,
Thank you for this article.
Are you able to add listener services as well in the domainless AG’s? Currently I’am curious of how to add a Client Access Point (extra name) in Windows Server 2016 cluster.
I have created an AG failover scenario between a local VM and a VM in azure. With a loadbalancer it must be possible to create a listener service in an On-Prem – Azure AG.
Hi Klaus,
This is a fantastic article, many thanks for putting together.
Don’t suppose you have any presentations on Pluralsight?
Ben
Hello Ben,
I don’t have any trainings on Pluralsight, but you can find more about my online trainings here: https://www.sqlpassion.at/academy/sqlpassion-online-academy/
Thanks,
-Klaus
Thanks for a great document. It suit with my client need who want to do sql server sync between DC and DRC while there is no domain control.
Is it possible you can provide what are the rules or ports that need to do to complete this exercise.
Hi
Thanks for this great article. Can you help to list down what are ports require to get this failover and AG success.
Hello,
a client access point can be add manually, you need 2 steps:
1) register the netbios & fqdn name on hosts file on both cluster nodes
2) manually create the CAP with this powershell script:
Add-ClusterResource -Name “IPAddr_VRADBLSN” -ResourceType “IP Address” -Group “AG-VRA”
Get-ClusterResource -Name IPAddr_VRADBLSN | Set-ClusterParameter -Multiple @{“Network” = “CN Public”;”Address” = “10.248.234.101”;”SubnetMask” = “255.255.255.252”;”EnableDHCP” = 0}
Add-ClusterResource -Name “VRADBLSN” -Group “AG-VRA” -ResourceType “Network Name”
Get-ClusterResource -Name “VRADBLSN” | Set-ClusterParameter -Multiple @{“DnsName” = “VRADBLSN”;”RegisterAllProvidersIP” = 1}
Set-ClusterResourceDependency -Resource VRADBLSN -Dependency “[IPAddr_VRADBLSN]”
Start-ClusterResource -Name IPAddr_VRADBLSN -Verbose
Klaus,
Will Domain Less AG support Automatic Failover ?
Please Advice.
Hi thanks for the helpful article. I ran into a small roadblock.I was trying to add a 2nd database and given we can not do it using GUI. Do you know any article or link that can help with commands which will let me add a DB to the AG using automatic-seeding?
Thanks
Hi, thank u for the article, I could not find any answer on the net. As you explained in the article, in this workgroup senario we dont have DC and also DNS controller, just etc\host file, so error 1196 in cluster event is frustrating me, So what should I do for that ?
Is there any configuration on cluster to correct that ?